Bulk User Delete for Cloud
1. Introduction
Bulk User Delete application helps to delete users in bulk based on two criteria:
- By User Selection
- By Importing through CSV file
It will reduce the workload for Admin and also saves huge amount of time in deletion of multiple users at a time. Admin can use the "Search" field to filter users list. This application also enables Admin to export all users from the list and select the required users for deletion.
2. Application Installation
Step 1: Login as JIRA administrator
Step 2: Go to -> Jira Settings -> Apps -> Find Apps
Step 3: Find the "Bulk User Delete for Jira" and click "Try it free"

3. Bulk User Deletion Steps
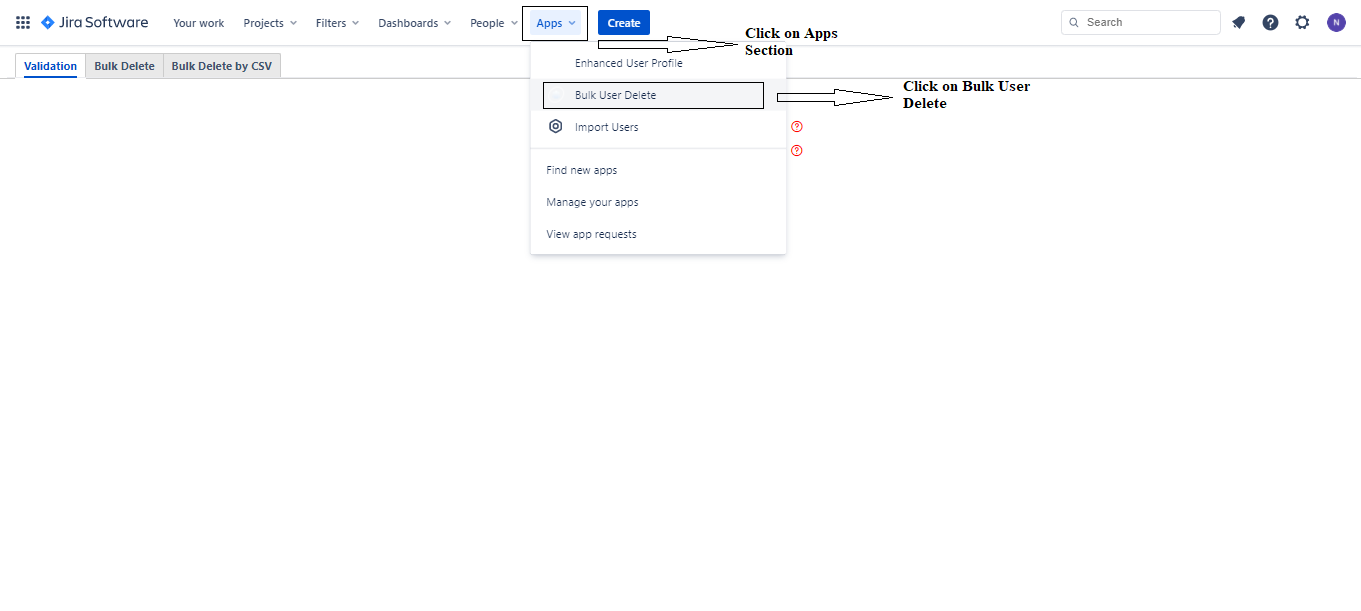
Step 1: Go to Jira Home -> Click on Apps drop down ->Click on “Bulk User Delete”
Step 2: Enter your Email address and API Token. You cannot access other tabs without entering the right credentials.

Step 3: Once you fill both the fields, click on "Validate".

Step 4: If you have entered the right credentials you will see "Success" message and you can continue using other tabs.

Step 5: If you enter wrong credentials you will see "Error" message which will restrict you from accessing other tabs.

Deletion by selecting users from the list
Step 1: Once you get the "Success" message in "Validation Tab" , click on "Bulk Delete".
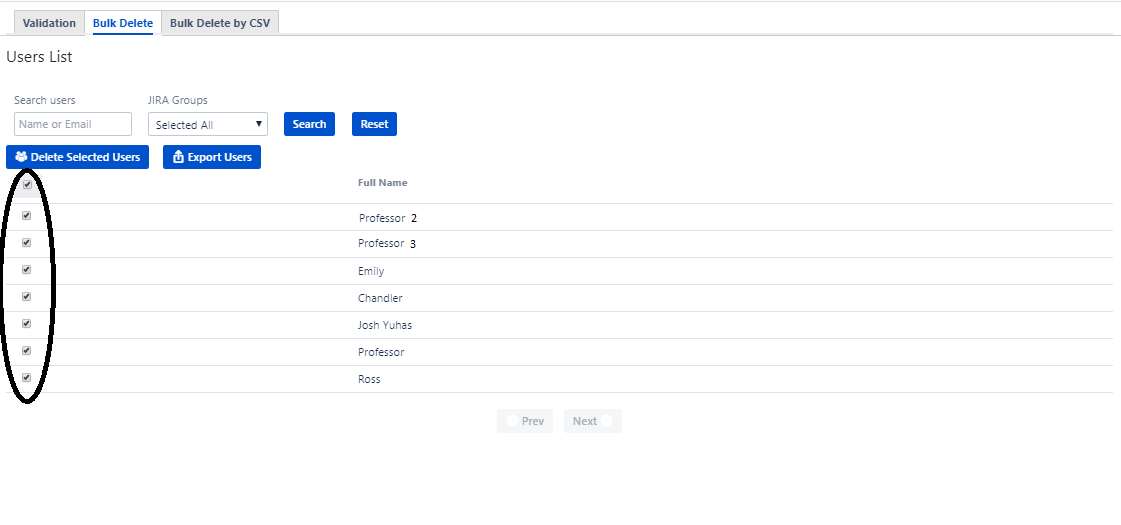
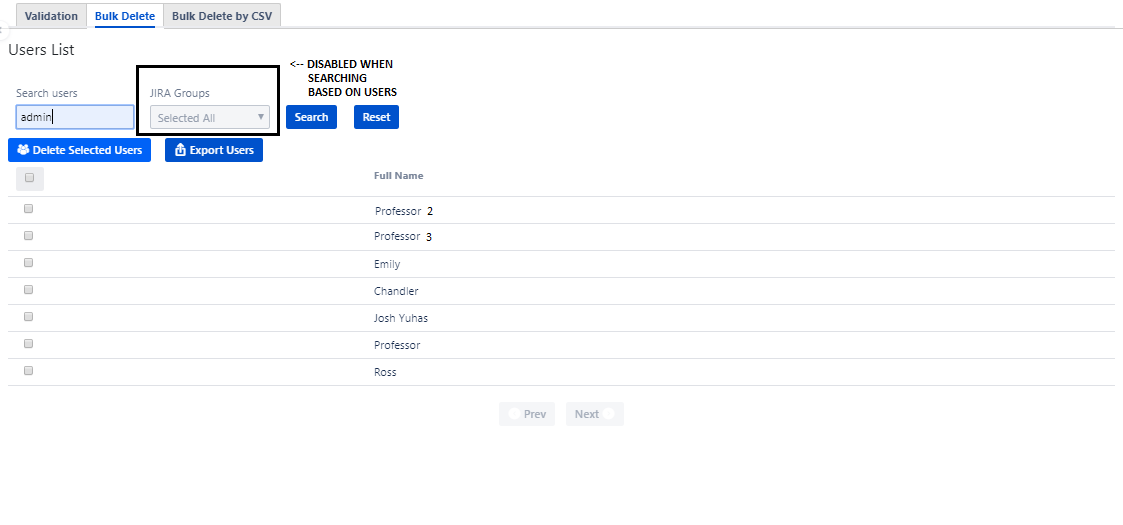
Step 2: You can see the user list when you click on "Bulk Delete" tab. Select the users you want to delete by using "Checkbox" and click on "Delete Selected Users" to delete the users.
Step 3: To select all users for deletion, click on the header "Checkbox", so all the users in the list will be selected for deletion.
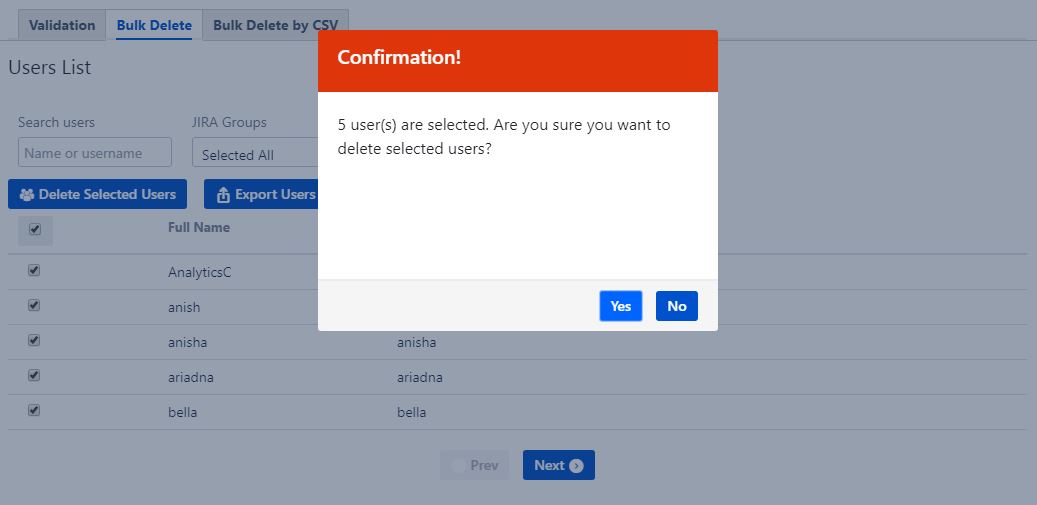
Step 4: Confirmation Dialog is shown to the Admin before the deletion process is initiated, by clicking on 'Yes' button the deletion process continues or by clicking on 'No' button deletion process will be aborted.
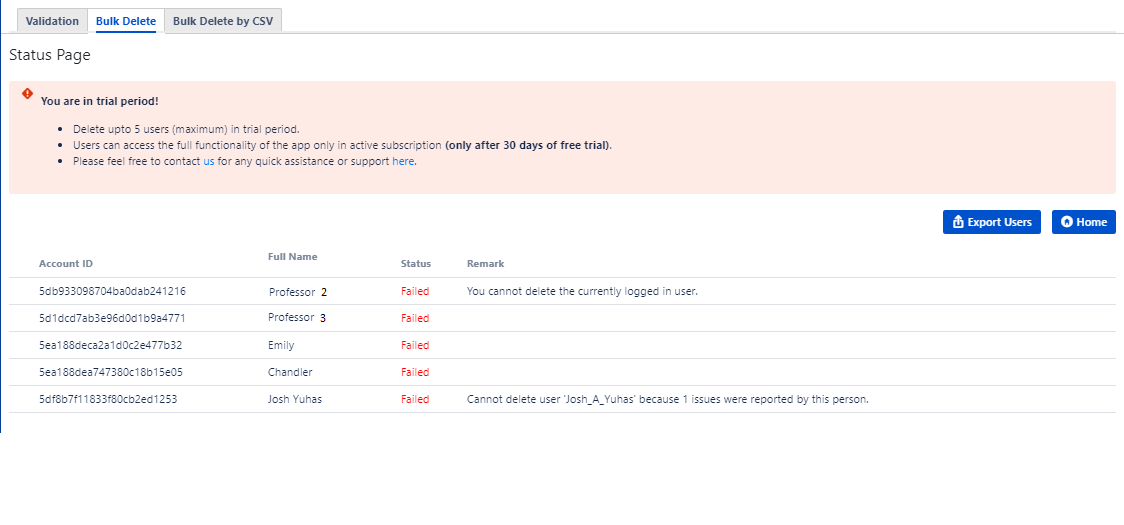
Step 5: Once the process of deletion is completed, Admin can see the "Status Page" which will display the "Deleted users list" along with "Status" of the deletion process. Check the "Status" column of all records to know if the user is deleted or not. Admin can also see the "Status Message" if the user is not deleted in the "Remark" column. Admin can delete up to 5 users in "Trial Version". Once the status is exported or viewed Admin can click on "Home" to go to the main page of the app.
(Refer Section 7 for license information)
Deletion by uploading CSV
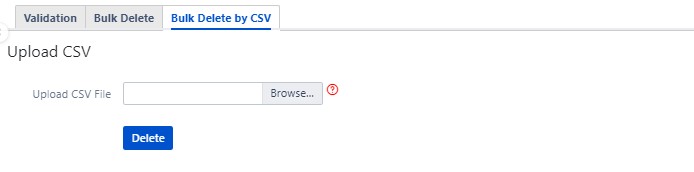
Step 1: Once you get the "Success" message in "Validation" tab, click on "Bulk Delete by CSV".
Step 2: You can see the option to upload CSV when you click on "Bulk Delete by CSV" tab. Click on "Choose File" button to select a CSV file and click on "Delete" to delete the users.
(Refer Section 6 for proper CSV format to be uploaded)
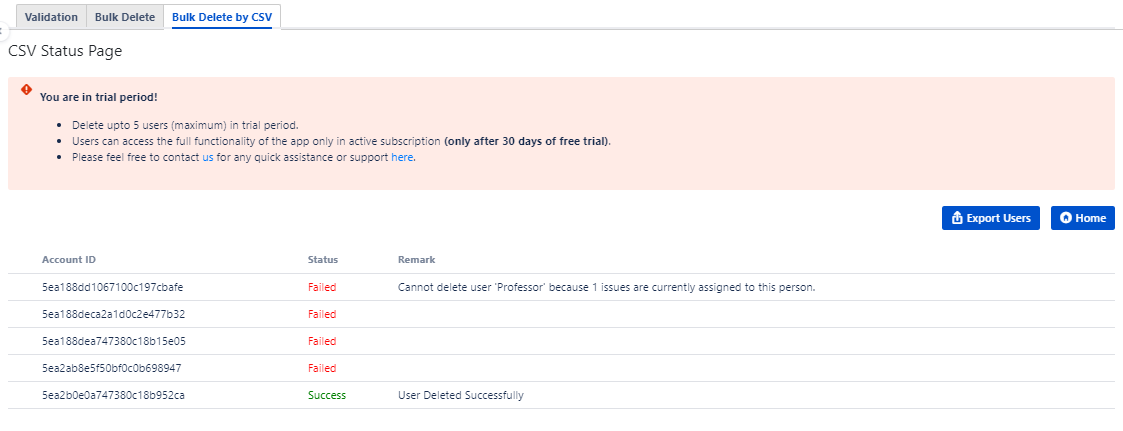
Step 3: Once the process of deletion is completed, Admin can see the "Status Page" which will display the "Deleted users list" along with "Status" of the deletion process. Check the "Status" column of all records to know if the user is deleted or not. Admin can also see the "Status Message" if the user is not deleted in the "Status" column. Admin can delete up to 5 users in "Trial Version". Once the status is exported or viewed Admin can click on "Home" to go to the main page of the app.
(Refer Section 7 for license information)
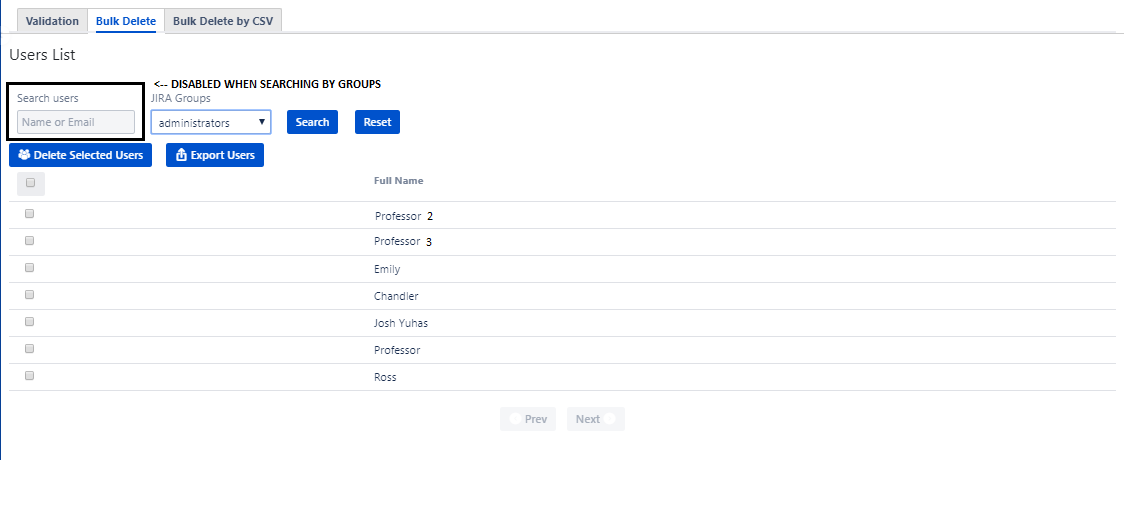
4. Filter users by search
"Search users" and "JIRA Groups" fields helps to get particular set of records from the user table.
Note: Admin can search users either based on name / email or JIRA Groups but not both.
Search users based on "Name" / "Email"
Enter the "Name" or "Email" and click on "Filter" button to view the results. Click on 'Reset' button to clear the filter criteria. JIRA Groups field will be disabled when you start searching based on name / email.
Search users based on JIRA Groups
Choose the "JIRA Group" from the dropdown and click on "Filter" button to view the results. Click on 'Reset' button to clear the filter criteria. Name field will be disabled when you start searching based on JIRA Groups.
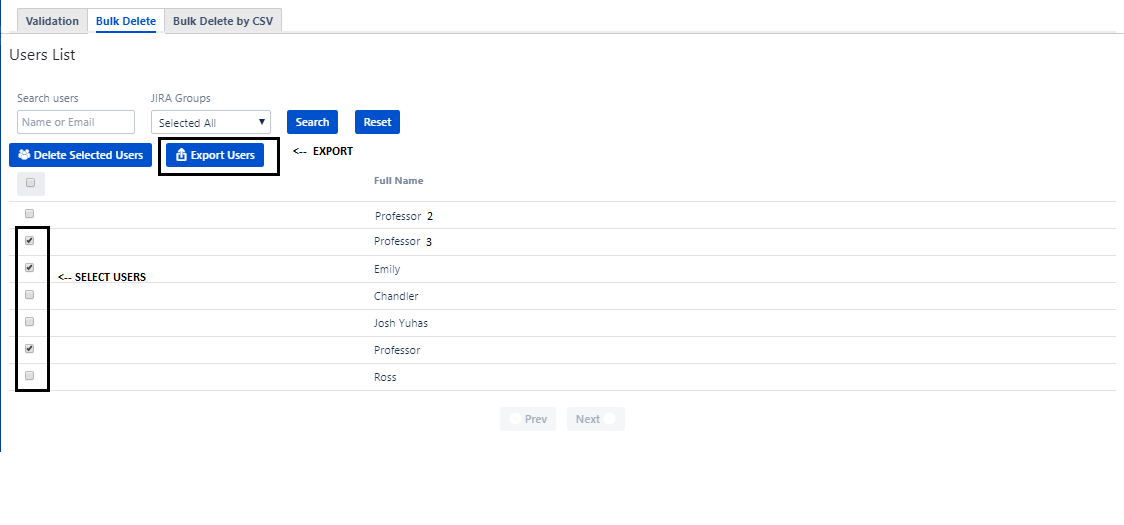
5. Export Users List
Export functionality by default allows Admin to export all listed users into a .csv file.
Step 1: Admin needs to click on "Export Users" button to perform export. To export user(s) from the list, Admin needs to select the user(s) by clicking the "Checkbox" for required user record(s) from the list and click on "Export Users" button. Although Account Ids of users are not seen in UI when users are exported csv file will contain the Account Ids of users exported.
Step 2: Click on "Export Button" to download all available users from the list to csv file.
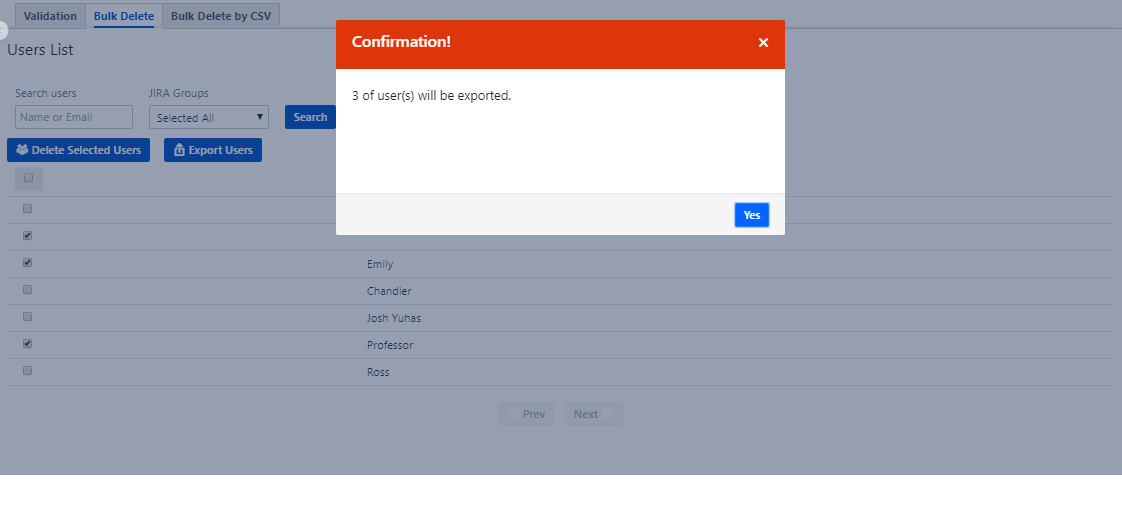
Step 3: Confirmation Dialog is shown to the Admin before the export, by clicking on 'Yes' button Admin can export or by clicking on 'No' button the process will be aborted.
6. CSV Format to be uploaded
- "Account Id" column containing account ids are mandatory.
- CSV file can also have other columns.
- Please refer to the sample CSV file enclosed below.
7. Trial Version vs Active Subscription
Note for Trial Version:
- App has 30 days free trial period where users can try the app
- The trial version allows to delete only 5 users at a time
- Users can access the full functionality of the app by purchasing the subscription
Table of Content: