.
1. Introduction:
Many companies use ServiceNow and Jira for their different teams for different purposes. bi-directional sync between ServiceNow incidents with Jira issues. Many times engineering and product team uses Jira, while customer support and operations team are on ServiceNow. This App is designed to bring these two disprate disparate systems together. This app allows for seamless bi-directional sync between ServiceNow incidents with Jira issues.
2. App Installation:
Go to Atlassian Marketplace and search for “JIRA ServiceNow Connector”
Step 1: Login as JIRA administrator. Go to -> Administration -> Add-on Manage Apps -> Find Add-on New Apps
Step 2: Find the "Jira ServiceNow Connector" and click "Install".
...
Step 2: Click on “Edit Integration Settings” and enter admin user, password ,ServiceNow API URL and Jira Integration User then click on test connection. If test connection is successful then click on “Save Connection”.
...
ServiceNow User : ServiceNow login user name. You can get from ServiceNow
ServiceNow Password : ServiceNow password. You can get from ServiceNow
ServiceNow API URL : ServiceNow login url.
Jira Integration User: Create an integration user in Jira and use this user to connect from ServiceNow to Jira. Give appropriate permission
Note: If you are not able to connect to ServiceNow, then please check the user and its roles.
You need below users and roles to connect to serviceNow
Admin user: Any servicenow admin user (Just for testing and not recommended for production)
Integration user: Create an integration user or any user in servicenow and add below roles
itil
personalize_dictionary
Enable Issue Events
To have a control over the create and update functionality, we have introduced this “Enable Issue Events“ checkbox feature. Using this feature, we can control the events on which the data is sent over to ServiceNow from Jira.
Step 1: If you only want to create the incident in ServiceNow, you can leave the update checkbox empty. Check the Create checkbox and click on save.
...
Step 2: If you only want to update the incident in ServiceNow, you can leave the Create checkbox empty. Check the Update checkbox and click on save.
...
Step 3: For synching on both create and update events, check both the checkboxes and click on Save.
...
Enable Attachment Event
To have control over the create and update attachment functionality, we have introduced this “Enable Attachment Event“ checkbox feature. Using this feature, we can control the events on which the attachment data is sent over to ServiceNow from Jira.
Step 1: If you only want to add attachments while creating the incident in ServiceNow from Jira, you can leave the Update Attachment checkbox empty. Check the Create Issue and Create attachment checkbox and click on Save. If create checkbox is checked then only we will be able to do the Create attachment checkbox checked.
...
Step 2: If you only want to add an attachment while updating the incident in ServiceNow from Jira, you can leave the Create Attachment checkbox empty. Check the Update attachment checkbox and click on Save.
...
Step 3: For synching on both create and update attachment events, check both the attachment checkboxes and click on Save.
...
Custom URL configuration
If we click on “Api Configurations“, there will a form will open like this,
...
If we have any custom URLs for ServiceNow, we can add it in the form. If any URL's exist in the form then we will be using that URLs for that specific operation, else default table API’s will be used.
Note: We can Create either Incident or Change request using this form.
Sample URLs for ServiceNow Incident Creation
Test Connection End Point: This end point will be used when we are doing the test connection in “Integration Settings“ page
Sample URL: /api/now/v2/table/incident?sysparm_limit=1
Get ServiceNow Incident Fields End Point: This end point we will be using to get ServiceNow fields in “Field Mapping“ page, while adding mapping
Sample URL: /api/now/v2/table/sys_dictionary?sysparm_query=name%3Dincident%5EORname%3Dtask&sysparm_display_value=all&sysparm_fields=column_label,sys_name,name,read_only,max_length,active,mandatory,comments,sys_created_by,element
Create Incident End Point: This end point we will be using to create the incident in ServiceNow
Sample URL: /api/now/v2/table/incident
Update Incident End Point: This end point we will be using to update the incident
Sample URL: /api/now/v2/table/incident/__sysId__
Add Attachment End Point: This end point we will be using while adding the attachment to ServiceNow incident
Sample URL: /api/now/attachment/file?table_name=incident&table_sys_id=__sysId__&file_name=__fileName__
Fields Mapping
Pre-
...
requisites for field mapping
Create custom fields in JIRA
Sl No | Field Name | Field Type |
|---|---|---|
1 |
Data Source
Text
Service Now Incident Number | Text |
2 | Sys ID | Text |
*Note: Add the above field in issue screens
Custom Field in ServiceNow
Sl No | Field Name | Field Type |
|---|---|---|
1 | Jira Issue Key | String |
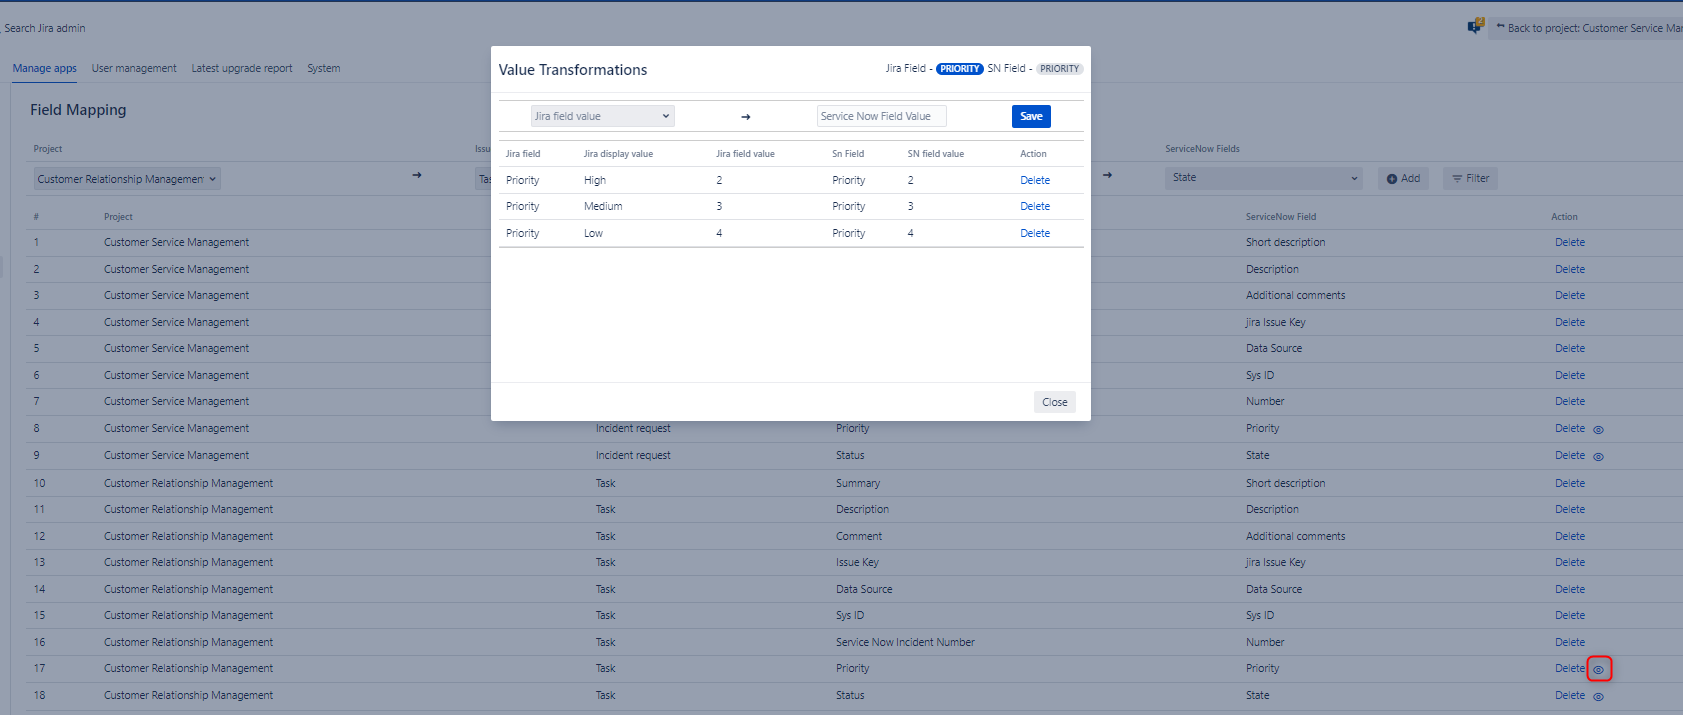
Step 3: Click on “Fields Mapping” menu and select the project, issue type, Jira field, and ServiceNow field then click on “Add” to save the mapping.
...
Summary => Short Description
Description => Description
Service Now Incident Number => Number
Service Now Incident Sys Id => Sys Id
Data Source Comments => Data SourceComments => Additional CommentsAdditional Comments
Issue Key => Jira Issue Key
Minimum field value mappings required to create incident in ServiceNow
...
Filtering
You can use filter dialog to filter the mapping records based on project, issue type and Jira field. In order to filter the records please follow the following steps
Step 1: Click on the filter button besides 'Add' (add field mapping) button to open the filter dialog.
...
Step 2: Select project (if you want to filter the records in the mapping table by project alone), issue type(if you want to filter the records by selected project and selected issue type) and Jira field (if you want to filter the records by selected project, issue type and Jira field).
...
Step 3: Click on “Set Filters“ button to filter the record in the table based on the selected values
...
Step 4: Now you can click on 'Close' at the top right corner of the dialog to close it and see the filtered records. You can close the dialog by clicking on anywhere else on the screen too.
...
Note: You can clear the filter by clicking the ‘Clear Filters' button. Please remember that filter will remain applicable unless you manually clear them by clicking the 'Clear Filter’ button in the filter dialog or refresh the plugin page.
5. Configure in ServiceNow for Synchronization:
...
Give name of Business Rule
When to run : Enter when to run it
Actions : Set your field values [ If you have any field values to setup, based on code snippet shared below you don’t need this settings]
Advanced : Write script
...
Click on Advanced Tab-> Enter the update script ( Please refer the sample script to update the fields from ServiceNow to Jira Server)
| Code Block |
|---|
try {
	gs.log("####START OF INCIDENT UPDATE####");
	var request = new sn_ws.RESTMessageV2('JIRA Update Issue', 'PUT');
	request.setEndpoint(request.getEndpoint() + current.u_jira_issue_key);
	gs.log("##The End Point :"+request.getEndpoint(),'UpdateJiraForDemo');
	var currentIssueKey = 	current.u_jira_issue_key;
	var currentDescription = current.description.replace(/\n|\r/g, " ");
	var currentDescriptionSplit = currentDescription.split("-------------------------------------------------------------");
	gs.log("The End Point"+request.getEndpoint(),'UpdateJiraForDemo');
	var currentShortDesc = current.short_description.getDisplayValue();
	var requestBody = {
		fields: {
			summary: currentShortDesc,
			description: currentDescriptionSplit[1]
	};

		gs.log("The request body :"+JSON.stringify(requestBody),'UpdateJiraForDemo');
		request.setRequestBody(JSON.stringify(requestBody)) ;
		var response = request.execute();
		var httpStatus = response.getStatusCode();
		gs.log("The Status Code "+ httpStatus,'UpdateJiraForDemo');
		gs.log("####END OF INCIDENT UPDATE####",'UpdateJiraForDemo');

}
catch(ex) {
 var message = ex.message;
}
})(current, previous);
|
Note: You may need ServiceNow team help to understand the code if you are new to script
5.2 Field Support for Incident
Field Label | Field Name | Type |
|---|---|---|
Number | incident.number | string |
Short description | incident.short_description | string |
Description | incident.description | string |
State | incident.state | choice |
Additional comments | incident.addedComments | journal input |
Assigned to | incident.assigned_to | reference |
Assignment group | incident.assignment_group | reference |
Caller | incident.caller_id | reference |
Category | incident.category | Choice |
Impact | incident.impact | choice |
Priority | incident.priority | choice |
Urgency | incident.urgency | choice |
Problem | incident.problem | reference |
Work notes | incident.work_notes | journal input |
Work notes list | incident.work_notes_list | list |
….. | …. | … |
Note: All fields of Incident table. Provision to map the field values in Jira
...
Step 4: Enjoy this seamless integration between Jira to ServiceNow ![]()
7. Release Note:
Version 1.8 (Latest: recommended)
Addressed and implemented security fixes to enhance the overall robustness of the system.
Users now have the ability to configure custom APIs for ServiceNow, providing more flexibility and customization options for integration.
Checkbox Flexibility for Issue Events and Attachment Events.
Allows users to create either incidents or change requests, providing greater adaptability to specific workflow requirements.
Version 1.4 (Latest: recommended)
...